Today we take a closer look at understitching, the next post in a series about sewing techniques included in our new Glossary of Common Sewing Terms. I was inspired to take on this nerdy topic while sewing a sleeveless Carpe Diem dress, which benefits from understitching at the neckline and underarms. (Watch our social media this week to see the dress come together!) Whether you are a beginning sewer or seasoned, this review can help you achieve crisper results on the next faced garment you make.
Where Is Understitching Needed?
Understitching refers to a line of straight stitching that attaches a seam allowance to an internal finish, such as a facing. In a garment, understitching anchors clipped and graded seam allowances to the facing in a neckline, waist finish, or armhole. It holds the seam flat and prevents the facing from rolling to the right side of the garment.
You’ll find understitching in the directions for several Fit for Art Patterns.
The Carpe Diem Dress & Tunic employs understitching along the curved edges of the neckline and underarm panel.
Understitching on front scoop neck facingUnderstitching on back neckline facing
Understitching creates a smooth and professional looking finish to the edges of a garment. It is easy to do and adds just one more step to the process of finishing a garment edge with a facing. In this example, Carrie used it to finish the curved front and back necklines of this Carpe Diem Dress. You are seeing the garment from the wrong side, so notice how the right side of the garment is favored, or just visible, on the wrong side. In the photo at the top of the blog, understitching secures the back facing in a Rain or Shine Variation with a collar.
How is understitching done?
When I went looking through my photos for appropriate samples for this post, I found the understitching in those projects difficult to see. The following step-by-steps were mocked up to illustrate the steps of understitching using green thread to stitch the seams and red thread for the understitching.
1. Begin by stitching the facing to the garment right sides together as usual.
2. After stitching the seam, grade and clip the seam allowances to assure a clean, flat result.
Trimming a seam allowance reduces the bulk in the finished seam. Grading means to stagger the depth of the trimmed seam allowances. Typically, the seam allowance of the facing or inner layer is trimmed shorter than the seam allowance of the outer layer of the garment (or fashion fabric).
Clipping permits seam allowances to flex and move as needed when the garment is turned right side out. Typically, small snips are made in the trimmed seam allowances from the raw edge inward, stopping short of the sewn seam. The more curved the seam, the closer together the clips need to be made. Snips work well for gentle and for concave curves.
Underarm curve graded and clippedNeckline graded and clipped
3. After grading and clipping, press both seam allowances toward the facing.
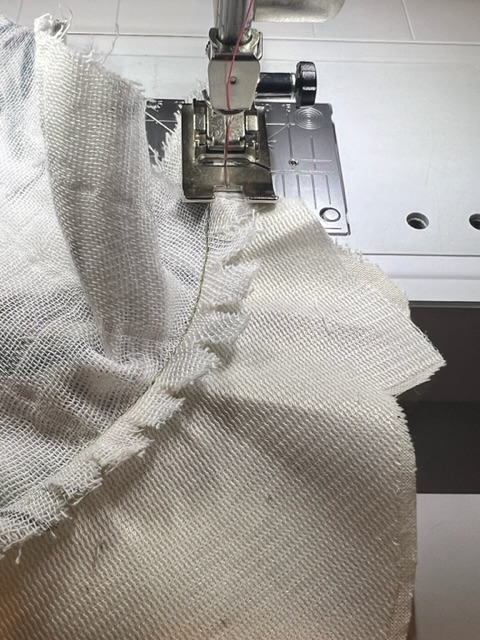
4. Stitch a line of straight stitches about 1/8” from the seam line, capturing both seam allowances against the facing. Go slowly, being careful to adjust the fabric as you go to keep it lying flat. Before you leave the machine, turn the garment right side out to make sure you haven’t accidentally caught any pleats or tucks in either the garment or facing. Pull stitches out and redo as needed.
Understitching straight seamUnderstitching completed on straight seamUnderstitching curved seamUnderstitching completed on curved seam
In these photographs, I am understitching from the wrong side of the garment so you can see its function, securing both seam allowances to the facing. The better practice is to stitch from the right side of the garment for an even line of stitches. Feel with your fingers as you go to make sure the seam allowances stay pressed toward the facing and lay flat.
Uderstitching facing from the right side of garment
5. Turn the garment right side out and press the finished seam from both sides. The understitching will ensure that the garment side is slightly favored so that the facing doesn’t show on the right side of the garment.
Finished and pressed edge from wrong side of garmentFinished and pressed edge from right side of garment
A Special Case
Understitching can be tricky in some situations, such as a deep convex curve. I created one sample with a very steep curve to illustrate the challenge. Instead of snipping into the trimmed seam allowances, I clipped small triangles of fabric out of the seam allowances. These larger clips reduce the bulk from fabric crowding into a smaller space when the garment is turned right side out.
Convex seamConvex seam allowances graded and clipped with triangles
The sample had to be turned right side out to get the seam under the foot of my machine. Stitching inward from each end, I could not stitch all the way around the peak of the curve. When you cannot understitch the entire seam, go as far as you can without stretching the fabric out of shape or catching unwanted tucks.
Understitching convex curveUnderstitching on clipped trianglesFacing side of understitched curve
Have you found tricks or tips to improve under stitching in your garments? Please share them with all of us in a comment on this blog post.
Happy Sewing, Carrie
4 thoughts on “Back to Basics — Understitching”
Jeriann Walsh
This post is quite detailed, a very good illustration of the technique, but the word “edgestitching” is used at the beginning and thereafter the word “understitching” is used. Do you mean that they are the same? Thanks for your always informative posts.
Thank you, this is a great explanation of understitching- I have occasionally had to do this on purchased clothing with flappy neck facings and always do on clothes I make even in situations that the pattern does not call for I guess this is a result of 8th grade Sewing class– way way to long ago,when it was a mandatory class that rotated with Cooking and Home Economics!


This post is quite detailed, a very good illustration of the technique, but the word “edgestitching” is used at the beginning and thereafter the word “understitching” is used. Do you mean that they are the same? Thanks for your always informative posts.
Oops! Thank you Jeriann; it has been corrected.
Thank you, this is a great explanation of understitching- I have occasionally had to do this on purchased clothing with flappy neck facings and always do on clothes I make even in situations that the pattern does not call for I guess this is a result of 8th grade Sewing class– way way to long ago,when it was a mandatory class that rotated with Cooking and Home Economics!
As always, your explanations are so clear and help improve my sewing. Thank you for sharing your wiadom!