Knit pants are comfortable and great for working out when smartly styled. Let’s take a look at some Eureka! Pants made in knit, using the Glamour Details Contoured Waistband and Fingertip Pocket.

Prepare the pattern and cut out the pants
I started by tracing off my personalized Eureka! Pants pattern that had been adjusted smaller for very stretchy fabrics. Using the templates and directions in the Glamour Details booklet, I dropped the waistline and created the contoured waistband pattern.
This pattern creates a 2” wide waistband so I purchased some 2” wide elastic to fill in the waistband when the pants were constructed. I also ordered a 5” nylon zipper to use for closing the pocket. Both elastic and zipper are included in the kit if you purchase some of this great Ponté Knit, available right now in our store.
Build the pocket
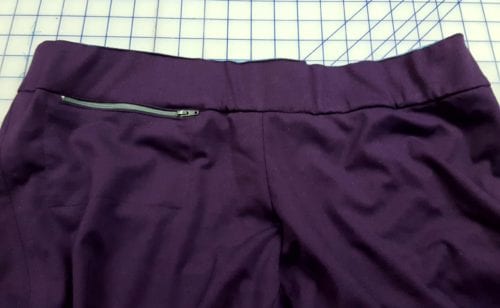
Using the directions for placing the fingertip pockets, I marked the placement of the large Fingertip Pocket on my pants front pattern. I cut out 2 pants fronts, 2 backs, 2 front waistbands cut on the fold and 4 back waistbands and 1 large fingertip pocket.
I marked the placement of the pocket on the Right Front only. I was only using one pocket and placed it on the right because I am right handed. I fused a 1 ¼” wide by 7” long strip of stretch interfacing and fused it centered over the pocket placement markings.


Stay stitch all around the pocket opening which extends down 7/8 “ into the front, 5” across the top and 7/8” back up to the top of the pants. Clip into each corner cleanly and press the pocket opening so the seams are on the inside.


Turn the two ends to the back and stitch them in place.
Lay the zipper into this opening. Pin and then top stitch it in place as you would an exposed zipper. Be careful to avoid hitting the metal ends of the zipper with the needle.


Finish the raw edges of the fingertip pocket. Lay the pocket on the inside of the pant, right side of pocket against the zipper. Pin and then top stitch the pocket to the pants, stitching along all three sides of the pocket. It will fill in the pants behind the zipper to create a continuous top edge of the pants. Stitch the unattached edge of the zipper to the seam allowance along the top of the pocket.


Construct the Pants
Construct the pants as pull on pants closing up the back where the zipper would usually sit. Now construct the two contoured waistbands, stitching the center back together on the waistband. Leave an opening in this center back seam on the waistband facing for the elastic to feed through; clean finish the bottom edge of this facing. Press waistband seams open to distribute the bulk.
Add the Waistband
Pin and then stitch the waistband to the top of the pants, matching the seams. Be careful to avoid the zipper teeth and metal ends when you sew across the pocket opening.

Next, pin and then stitch the waistband facing to the waistband. Grade these seams and press the facing to the back of the pants. Topstitch through all layers to set the top of the waistband casing.

Stitch in the ditch to secure the lower edge of the facing to the pants along the waist seam. Begin with the zipper foot installed to stitch down the zipper area, then change to your regular foot or stitch in the ditch foot to complete the waistband anchoring stitches.

Feed the elastic into the hole in the waistband facing. The elastic will need to be smaller than the waistband to hold the pants in place. Test the fit before stitching the elastic into a continuous circle. Closeup the hole with machine stitching.

Put on the pants, arrange the elastic for comfort, then take off the pants and top stitch through all waistband layers at each side seam and in the center front to keep the elastic from twisting as you wear the pants.
Sew Some Yourself
We currently have kits for these pants available in black, and a limited number available in purple and light navy. The kits include either 1 1/2 or 2 yards of knit fabric, the 5″ zipper and 2″ wide elastic you need to complete the pants. The fabric is very wide and has no noticeable nap so 1 1/2 yards will be plenty for most gals to make great pants. Carrie and I both love this fabric, it has a nice give and a nice drape, is easy to sew with and washes beautifully. You will want a pair for everyday.
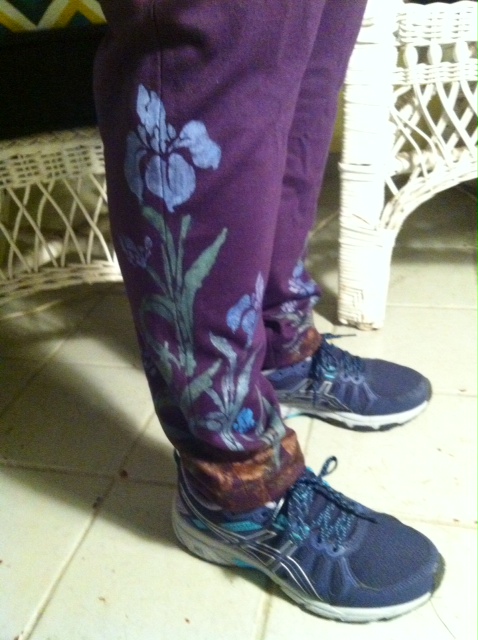
Make a simple pair first, then decorate them if you wish as I did with these purple pants that have painting on the hemline. See the previous post, Painted Knit Pants to read more about that process.
Happy Sewing, RAE


