A few months ago we posted a blog with directions on how to alter your Tabula Rasa Jacket pattern to give it a trimmer fit. Today we are presenting an alternative method for pulling the jacket in to define your waist by adding an obi belt or attached sash! Detailed directions for both of these belting methods are available on our website as a printable PDF at this link “Wrap It Up!”
The Obi Belt is an oblong oval about the circumference of your waist with a long self-fabric tie attached to each end for encircling the waist and securing it on. One of the advantages of the Obi belt is, of course, that you can wear the jacket with or without the belt. Here are a couple of samples to inspire you:
The first photo shows Rae’s daughter Anna modeling a TRJ with a contrasting obi belt made entirely of one fabric. This jacket also features the Lantern cuff and sleeve from Sleeve & Cuff Variations for the TRJ.

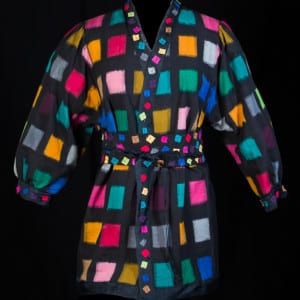
The second photo is an Ikat TRJ that Rae made for herself, “Bright Squares”. She used bits of Cherrywood fabric in the colors found in the ikat to embellish the obi belt and the front band of the jacket, both of which were made from black organza. This jacket also features 3/4 length full sleeves from the same set of Variations.

The third photo features our ASDP friend Barbara wearing a very basic cotton TRJ made from a group of fabrics we sold a few years ago. She is modeling it in the fashion show at the Original Sewing & Quilt Expo in Lakeland, FL in March. One of the fabrics in that bundle had several stripes or borders, so the obi was cut to feature one of those prints. 
Our Obi Belt instructions assume you will want to make the ties long enough to wrap all the way around and tie at your front, but you could also choose to use shorter ties and secure the belt in the back. You can also use purchased trim or ribbon to make the ties rather than creating a self-fabric tube.
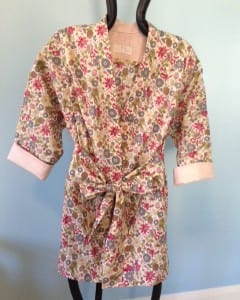
The sash differs from the obi belt in that it is attached to the jacket in the back side seams, and then wraps to tie in a knot or bow in front. Our instructions walk you through the process of determining your preferred location and length for the sash and cutting the fabric appropriately. Here are a few samples of garments made with an attached sash:

Rae wrote a blog post in December about the bathrobe she made for herself with an attached sash, so you can read more about it at this link “Fit for Art Pajamas and Robe”.
The second photo features Rae’s daughter Sarah wearing a dressier silk TRJ with an attached sash tied in a large front bow. Those Cumbie girls are very lucky to have a Mom who sews great jackets for them!

We would love to see the belts and sashes you have created to wrap up your Tabula Rasa Jackets! Please post a photo to our Facebook page or e-mail it to info@fitforartpatterns.com and we’ll post it for you.
Happy Sewing! Carrie


