Make some drawstring Eureka! Pants that Fit to use for sleeping, lounging or a swim suit cover up. I made a sample pair over the 4th of July weekend to use in an upcoming class. I like to make samples for a particular person so they are realistic in size and shape and have a “life” after the class is completed.
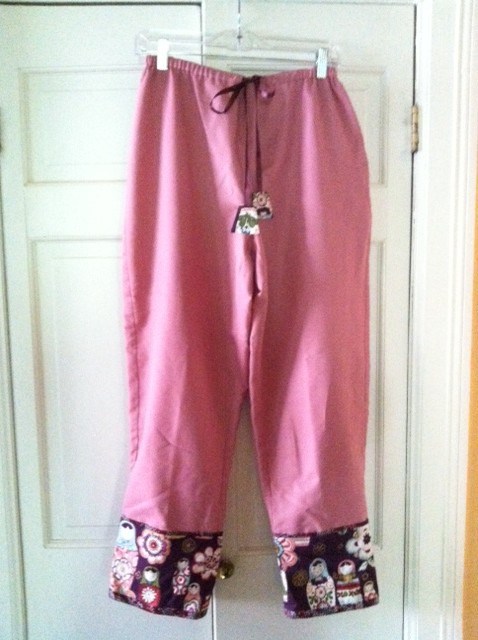
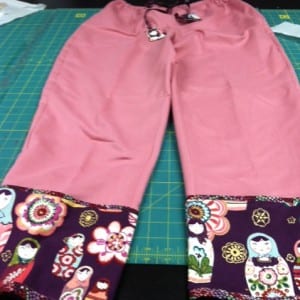
This sample was made with fabrics I had been gathering for pajama pants for my oldest daughter. I purchased the Russian nesting doll fabric at an expo from Some Art Fabric to use in garments for my daughter, my mother, and me. We are often compared to Russian nesting dolls because of our stair-step size and strong resemblance.
Sometimes sewing an easy sample lets my mind wander, which is one of the joys of sewing. My oldest daughter lives overseas and I rarely see her for her birthday which is over the 4th of July weekend. So as I stitched up these cute pants, I let my mind wander to the weekend she was born, other clothes I have made for her, birthday parties and more. It made the sewing of simple drawstring pants quite satisfying.
Here are some tips to help you make your own drawstring Eureka! Pants:
• Use the elastic waist directions in the Eureka! Pants that Fit instruction book as your guide.
• Widen the legs a bit if your Eureka! Pants fit closely; you’ll want a loose silhouette.
• Choose a cord, ribbon or covered cord for your drawstring.
• Measure the drawstring material to calculate the width needed for your waistband. I was using 3/8” wide ribbon so I doubled that number, added 1/4” for a topstitched edge at the top of the casing and then added 1 1/4” for the seam allowances. I cut my waistband 2 1/4” wide.

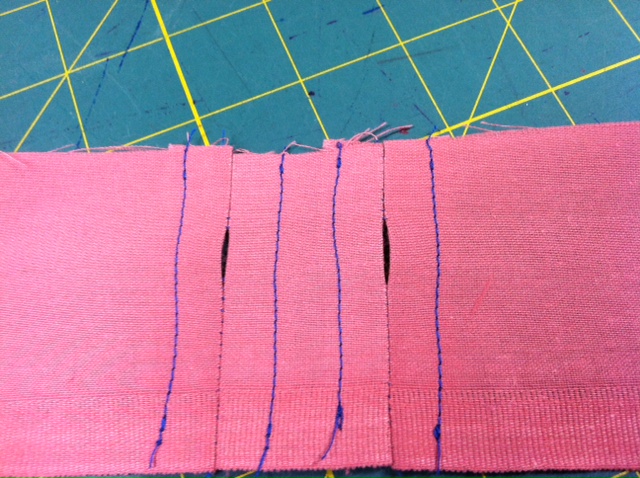
• Calculate the waistband length using the directions for the elastic waistband. I then added 1 1/4” to that number so I could put two inseam buttonholes in the waistband to draw my “string” through. (Read more about inseam buttonholes in our Bands and Pockets Variations for the Tabula Rasa Jacket)

• You could also choose to put a pair of buttonholes into the front of the waistband if you prefer that method of providing openings for the drawstring.
• After attaching the waistband with the drawstring holes on the outside, I stitched around the waistband just 1/8” down from the top for a neat casing.
• Feed the drawstring into one hole, through the casing, and out the other side.
• Put a knot or a little tab on each end of the drawstring to keep it from slipping back into the pants.

• It is fun to finish the hems with a contrast fabric or trim.
Make a pair for someone special and think about them as you sew. It will make your sewing time pass most pleasantly!