Welcome to Sew! Let’s Get Dressed, a weekly blog that encourages you to sew successfully.
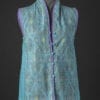
Sewing ruffles, in this case, A Tabula Rasa Jacket (TRJ) with the ruffled front Band Variation is so fun and fashionable. This jacket was a Me Made May stash busting project.

I had this printed silk broadcloth and matching printed silk crinkle chiffon on my shelf for several years wishing for some time to stitch up this ruffle front variation. The current fashion trend for ruffled tops and jackets and a reader request for a post about partial linings moved this project to the top of the stitching pile.
As I began finalizing the plan for this jacket I ordered some mauve colored china silk lining and unearthed some navy trim from my stash. The matching fabrics seemed disparate in color, not because the dies were different, but because the broadcloth reflects light and the chiffon absorbs light. Separating the two with trim was the perfect solution.
The jacket was cut using my basic TRJ pattern. For a ruffled band, the Band Variations and Pockets pattern directs you to calculate the width and length with this suggested formula. Determine your width and multiple by two, then add 1 ¼” for the seam allowances. To find the best length, measure the front opening and multiple by 3 for a very full ruffle which is what I wanted. Of course, I had to cut 4 strips to get my desired length.

I took care when assembling the long ruffle piece to have the directional floral pattern move in mirror image from the center back down each front. I suspect this was not really important since the patterns direction does not really show up on the heavily ruffled chiffon.

After the ruffle strips were sewn together into a long strip the ruffle was gently pressed in half to create the double- sided ruffle. I finished each end with a seam and then divided the ruffle into thirds. Two rows of gathering stitches were stitched into the seam allowance of each section. I overlapped the stitching lines a little at each join so the ruffle would be gather evenly.

Gently I pulled the gathering stitches to create the ruffle and arranged it so it ruffled evenly and matched the finished length of the jacket opening.
The ruffle was then pinned and stitched around the jacket opening, right sides together, beginning and ending at the hemline. You will see this more clearly in next week’s post when I write about the partial lining and hem finishes.
Similar ruffles were cut, constructed and attached to each sleeve as a cuff finish.

A small facing was cut and sewn to the sleeves to finish the raw edges of the ruffle and form the hem. Then the navy trim was hand stitched in place to finish each cuff.
If I had not planned to line the jacket, a similar facing would have been cut and used to finish the raw edges of the ruffle around the neck edge. The complete directions for these techniques can be found in the Band Variations instruction book.
As I mentioned above, next week we will look at how the partial lining was constructed, inserted, and how the hem is turned and finished around the ruffled band.

Have you made the ruffled or pleated band from the Band Variations and Pockets pattern? It makes your TRJs look quite different from the basic kimono band and adds a very feminine flourish. See more tops and jackets with Band Variations pattern in the gallery.
Happy Spring Sewing, RAE
Enjoy receiving our blog? Sharing is caring, so forward this post to a friend by clicking on the Forward link at the upper right corner of your e-mail notification. Remember that the beauty of the Fit for Art System is you can sew successfully with endless variations. Take a moment to review our variation patterns offered by clicking here. Also, are you following us on social media? Take a moment to check us out on Facebook and Instagram and follow the hashtag #fitforartpatterns and #sewsuccessfully.