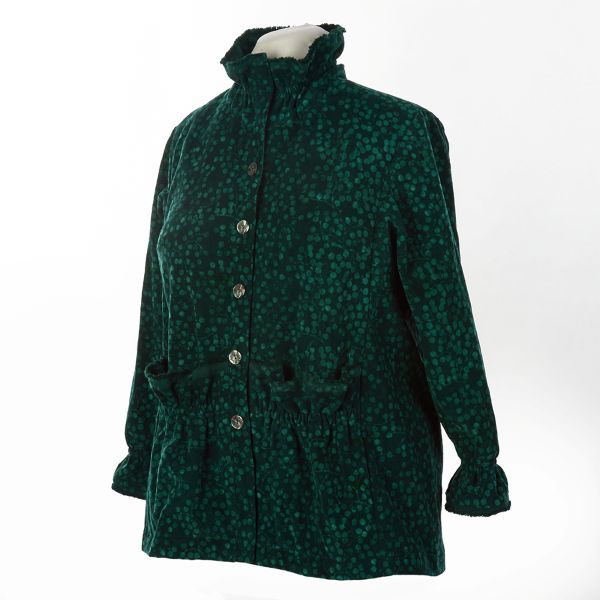
In October, Rae received a package from SewBatik with some of their new corduroy batik fabric in hunter green. It was destined to become some sort of shirt or shacket for SewBatik to use when promoting the fabric. We love their fabrics and our wardrobes are full of SewBatik garments. The corduroy has a really nice hand and terrific selvages to play with. It needed some dramatic details to be seen in the luscious dark print.
Planning and Imagining
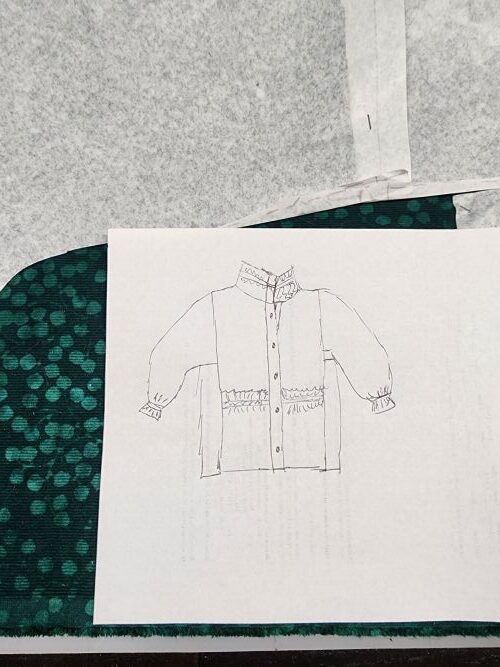
Rae decided to use the shirt collar version of the Opus Jacket as her base pattern. The Opus Pattern is found in our book Sewing Quilted Patchwork Jackets, but it’s suitable for other projects as well. Because of its looser cut, it seemed perfect for a jacket that would need to fit comfortably over a light sweater or beefy tee. That said, the Tabula Rasa Jacket with Shirt Variations would work just as well for this project.

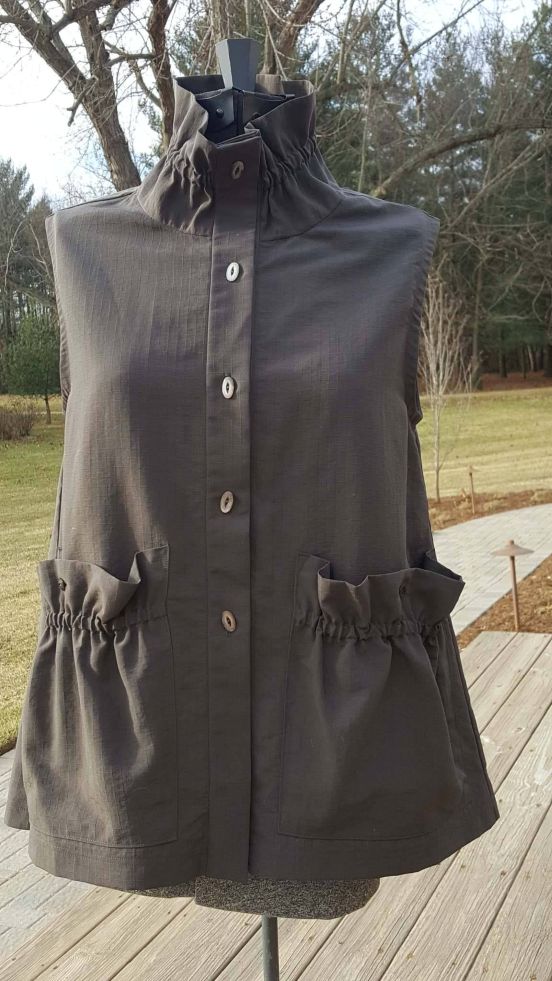
Having chosen the pattern, Rae moved on to choosing some terrific details. Naturally our Pinterest pages were the first place to look. The Insp: Pockets and Inspo: Shirts and Shirt Dresses boards are great places for inspiration. A terrific vest caught Rae’s eye with large “paper bag pockets” and an interesting ruched collar with elastic. It did, however, require some thoughtful planning to add these details to the Opus Pattern.
Thanks to the magic of the computer screen, she was able to expand the image to see how the vest had been put together. Short of touching it, this gave her insight into how to integrate these details into a basic garment design. The pockets covered most of the front, ending about 1½” from the center front. The collar was gathered with an elastic casing, but the elastic detail similarly ended about 1½” from the center front. Topstitching had been used to turn this 1 1/2″ wide section into a tidy looking faux placket. Yes, of course, that would even work with Rae’s concept of finishing the detail edges with the fabric’s selvage.
Sketches and samples were made to test ideas using some scraps of corduroy from a previous project. What made this all so appealing is that these details needed to have enough body to keep their shape, and the corduroy seemed like it was sturdy enough to meet this requirement.
Preparing to Cut
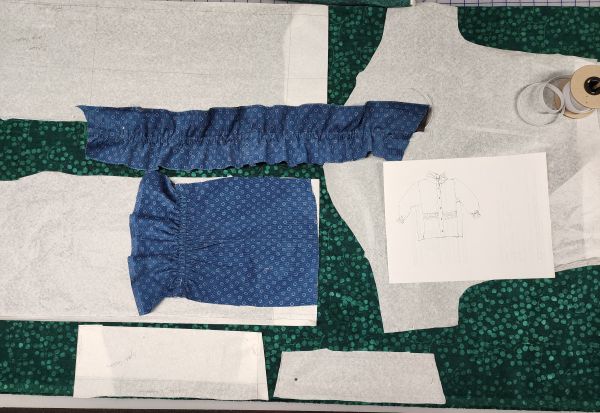
After prewashing the fabric and making test samples, it was time to lay out the pattern pieces and cut out the jacket. The amount of fabric, 2 yards at 57” wide, was barely enough, especially since Rae planned such big pockets and desired to lay certain pattern pieces out along the selvage. If you want to try this, she recommends adding at least ½ yard to your typical yardage purchase so it will not be such a puzzlement. After some tricky manipulation, she was able to lay out the collars on the selvage and to cut sections of selvage to top the pockets and to insert into the hem of the sleeves, between the sleeve and the cuff lining.
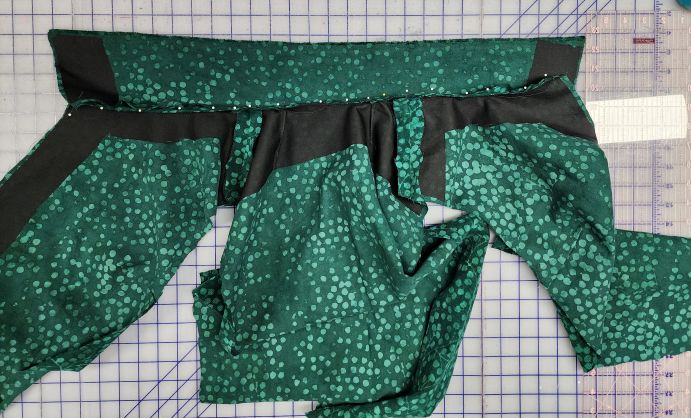
With a project like this, some of the usual construction steps need to be moved around and others added (such as where the interfacing is applied to support the placket, how the casings and extended edges above the casings were created). Be sure to think through and plan for those changes before you start! Using the Fit for Art square armhole design, made it easy to insert the pocket into the side seams, then topstitch the center front edge along the placket during the final steps of construction.

If you are interested in more construction details, scroll down below the salutation to find a detailed list of changes Rae made. Remember that either the Opus Pattern with the collar or the Tabula Rasa Jacket with spread collar from the Shirt Variations will work for this Sewbatik Corduroy Jacket design. You use the details you like best, make the necessary changes and then step back and take pride in this really striking topper.
Rae has since learned that the original inspiration garment was made with a discontinued Vogue Pattern. If you have that old Sandra Betzina pattern, you can hack the details of the front placket, pocket and collar onto the Opus Jacket pattern that is personalized to your fit. Follow this link to read about the pattern on Pinterest.
If you are new to pattern changes, consider starting with a slightly less ambitious project, such as adding pockets but finishing the edges with bias binding as described in Opus project # 10 instead of using the selvage edge detail. One change is a good start! Rae has been changing up patterns since she was in high school, so 3 or 4 changes do not impede her a bit. Use your best judgement, then get going.
Be sure to watch my conversation with Diane of Sew Batik on YouTube about this fun jacket. There are lots of tips about sewing with corduroy fabric and more.
Happy Sewing, RAE
Pattern Adjustments for the Opus Pattern
- Add 1” to the top of the collar; 1½” if you will be putting a seam in the top to finish it on the top edge.
- Create a pair of facings by tracing off the pattern’s center front, neckline and upper back pieces. If you are using the TRJ with Shirt Variation, the facing is included with the pattern.
- Lengthen the Front, Side, and Back if desired. (I used the Opus, 3” longer than the jacket cutting line.)
- Create the pocket pattern off of the Front pattern after it has been adjusted for length. Trace off the front of the pattern to the height of the desired pocket, remove 1 1/4” from the center front edge. Add to the side seam edge very gradually starting at the hemline, then expanding the fullness to an additional 2″ at the base of the casing. (I cut the top 2” of the pocket above the casing from the selvage edge and stitched the two together. I also cut a facing a bit longer than the upper pocket so it would be caught into the casing.)
Make the Collar
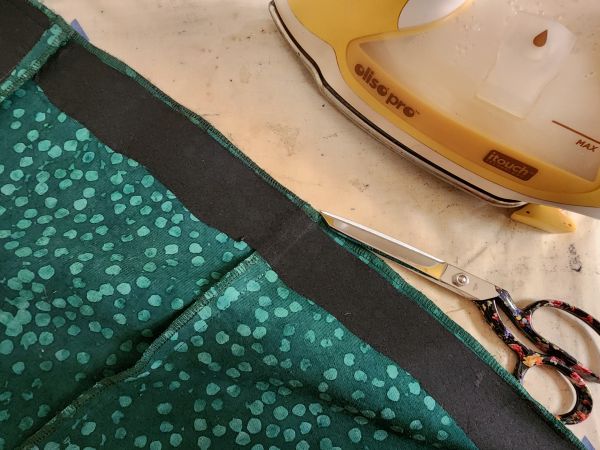
- Apply interfacing to the facings. Also cut a 2” strip of interfacing that will extend up the entire center front of each front, and a 2” strip to be fused to the edge at each short end of the collars.
- After sewing the shoulder seams and darts, attach one collar to the body of the shirt and one collar to the facings
- Pin and then stitch the facings right sides together with the body of the shirt. (If you have added seam allowance to seam the two collars together, do it during this step). Grade the seams and press the facings and center front flat.
- Align the two collars along the top edges.
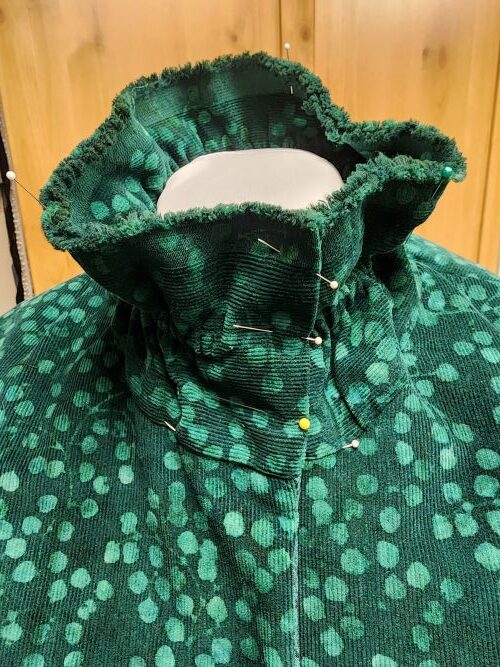
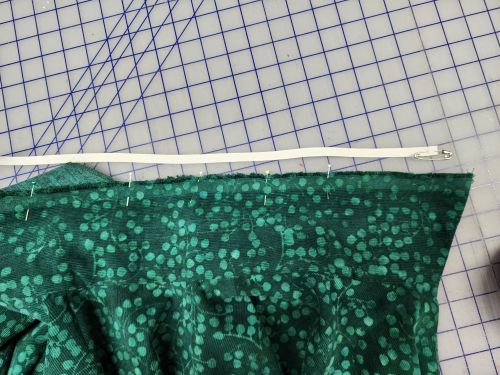
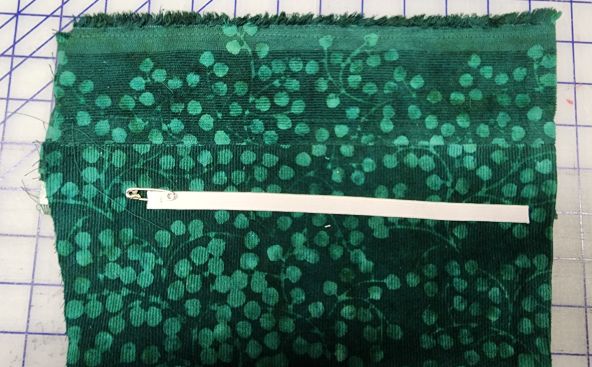
- Create the casing for the elastic by measuring down from the top of the collar 2”. Also measure in from the center front 1 1/4”. Stitch along the drawn line, beginning and ending with backstitching at each marked point.
- Stitch a second line ½” below the first line, or however much is needed to accommodate the elastic. This top has ⅜” wide elastic.
- Cut a piece of elastic an inch or two shorter than the length of the collar. Insert elastic into the casing using a bodkin or safety pin. The ends of the elastic will be between the two collar pieces (see photo above).
- Check the shape and fit around the neck and adjust as needed. Then anchor the end of each piece of elastic and go in between the collars to cut away any extra elastic length.
- If using selvages, top stitch the selvages together. Alternatively, clean finish the top of the collar with a bias binding.
Make the Pockets
- Use the same technique to create and finish the top edge of each pocket and pocket facing. For the selvage, topstitch the layers together.
- Measure down 2” from the top of the pocket and stitch the top line of the casing all the way across the pocket. Stitch the second line underneath again as it was done in the collar.
- Cut and insert elastic from side to side. Leave extra length to allow for adjustment.
- Fold under the straight side ¼” for the clean edge along the center front placket.
- Position a pocket on each front of the body. The straight, folded side should sit along the 1½” placket line. The side seam edge should be aligned with the side seam at the hem, then angle up slightly so there is extra as it moves toward the casing. Pin the side to the pocket evenly. Adjust the elastic as needed for the pocket to lay naturally on the body along the elastic line. (See Photo Above)
- Topstitch the pocket in place all around being careful to stitch very closely to the clean edge along the placket line and to capture the elastic ends.
Complete the Placket
- After completing garment construction and adding elastic casings and selvage edges to the edge of the sleeve if desired, prepare the hem and anchor with pins or clips.
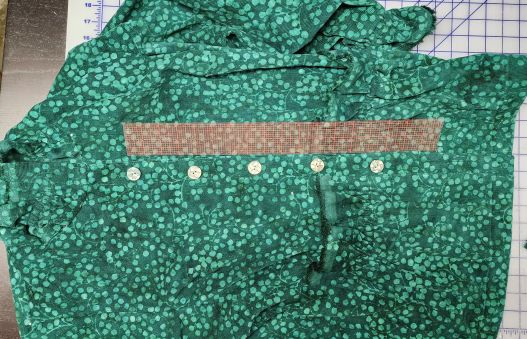
- Starting at the top of the collar on one front, top stitch 1 1/4″ from the finished edge of the center front to create the faux placket, continue down the front to the turned-up hem, around the body’s front, side and back to secure the hem, then back up the other front, finishing at the top of the collar on the other front.
- Press and then choose button placement.
- Mark and sew buttonholes on the right front. Stitch coordinating buttons by hand to the left placket. In corduroy, stitch the buttonholes so they run along the fabric ribs.
Enjoy wearing this fun top!


Just scrolling through my email and was REALLY surprised to see that the vest I made some years ago was your inspiration. I am smiling hard and having a good giggle. Charlotte
Thank you for the inspiration, Charlotte, and for reaching out! We are flattered and grateful that you are part of our community.