
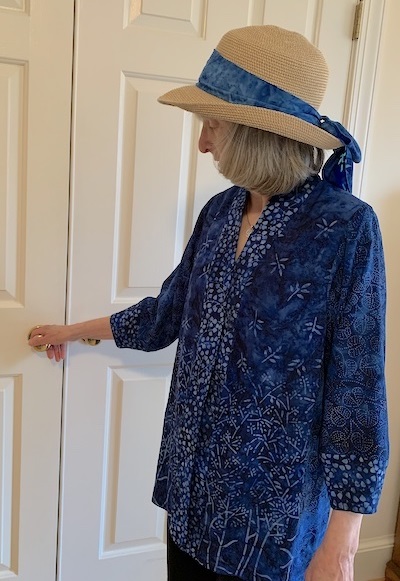
Sewing SewBatik Rayon into Fit for Art designs is a favorite pastime. When Diane, SewBatik’s co-owner agreed to let me make her a Carpe Diem, I worked hard to organize the long tunic she requested using the border print to its best advantage. Had to get it done to bring to her when we are together at the ISAF show in California later this month.

Follow along, or even better yet, order some SewBatik rayon and sew one for yourself.
Prepare the Fabric
Wash the Durum Dreams border print fabric in cold water with delicate detergent. Serging the raw edges keeps the fabric from fraying out during the pre-wash. Let it hang dry, then let it spend a few minutes on low heat in the dryer to relax the fibers. A good press finishes off the fabric preparation.
Prepare the Pattern
Personalize the Carpe Diem pattern so you know if will fit your personal curves. Having sewn for Diane before, the sizing was pretty predictable, but she did send measurements and I prepared the Carpe Diem pattern accordingly because of a few new covid pounds. If you are positioning the border print along the hem, the length must be accurate and she sent the exact length she desired so the pattern could be personalized. Luckily, the short dress length proved to be perfect to create Diane’s long tunic.
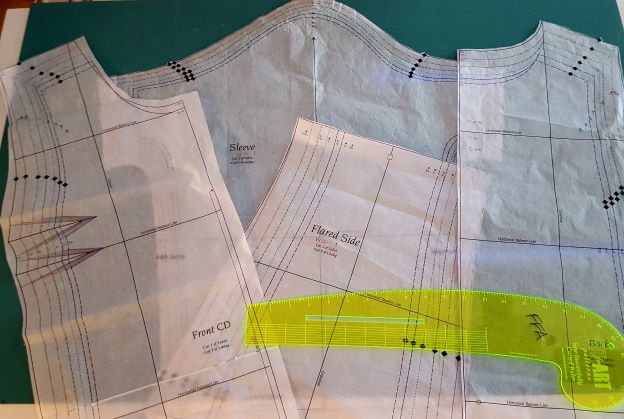
Lay out the Fabric and Pattern
Arrange the border print fabric on the cutting table, folding it in half along the cross grain and smoothing the two layers so the border lined up well. The piece she sent was a generous 2 yards long.

Because I have worked with the Durum Dreams border print on several occasions, I had already considered my options for border placement and was confident that the design would stitch up nicely with all the fabric cut on the cross grain. My hope was to get the body of the dress cut out along the selvage with the border. The sleeve would be cut along the plainer selvage, shortened to fit the fabric, as well as facings, pleat inserts, etc.
I placed the front on the fold and the back along the raw edges of the fabric. That left room for the sleeve to easily sit along the opposite selvage and the side panels in between the front and back. However, I had been hoping for a deep sleeve cuff featuring some section of the border to bring some interest to the edge of the rather plain sleeve. A pattern was created for the sleeve cuff and its placement was pondered. At this point I walked away for a while to do other things and consider options.

I returned to the cutting table with a two-step process in my plan. I carefully cut the front, back, sleeves, front facing and pleat insert so the remaining fabric could be reconfigured to cut the additional garment section.
Two good sized pieces featuring the border print remained. I folded each one in half along the cross grain. The two side panels were placed along the selvage to match the front/back and cut from the first piece. The two sleeve cuffs were positioned at the prominently patterned section, and cut from the second piece along with the back facings.

As a bonus, there was one piece of border print left which became a hidden pocket on one side panel. Watch Facebook and Instagram for the step-by-steps of this process later this week.
Enjoy the Process
It was fun to watch this short dress or long tunic come together. The print fit together well so the placement looks effortless. Of course we know better, but now have the knowledge to plan, organize and cut out a Carpe Diem to take full advantage of the fabric.
Val in her Tabula Rasa Jacket 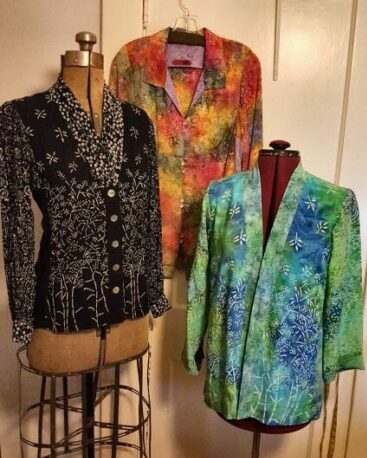
Sew Batik Lovelies 
Swing variation with Summer Sleeve and Narrow band.
Check out other ways to use the Durum Dreams border print, like the samples shown above and in our photo gallery. Or try out the Downton border print which is new at SewBatik; it is a bit easier to place, but still needs attention to achieve an effortless look.


Dear Rae and Carrie, I always knew that this pattern would make a wonderful dress, thank you for working out all of the details thus saving me this time – the border dress is perfect
Many thanks again’Joan
Be sure to send us a photo! RAE