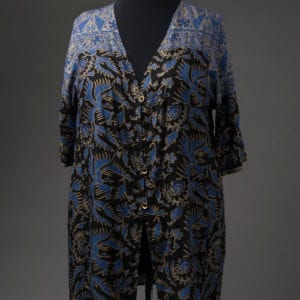
One of my new favorite samples to wear is this Tabula Rasa Jacket based on the Rain or Shine Variations. I made it from an Indonesian cotton batik sarong that I had had in my stash for a few years. (No personal history; just found it in a box of similar fabrics given to us by a friend of Fit for Art and loved the colors and motifs – thank you to the donor!) This project presented an interesting problem to solve that I had not anticipated at the conceptual stage of planning, but discovered in process.
The first issue with a figural print like this is layout; how do you cut the pattern pieces to take advantage of the motifs in the print? I played with laying out the pattern pieces until I found a way to let the “waves” of color move around the jacket while ensuring that the birds were flying right side up. I also contemplated how to use the 2 shades of perfectly matched orange Cherrywood cotton that I happened to have in my stash. In the end, I decided not to use the orange for the side panels, just for trim.


This jacket features the Rain or Shine jewel neck front which meets at center front, slightly altered by rounding the corners at the neckline. I knew I wanted it to be a transitional piece for summer to fall, so I made the sleeves ¾ length and added a banded cuff (Sleeve & Cuff Variations) out of the lighter Cherrywood orange. I used the darker Cherrywood orange as a piped trim all around the top’s center front, neckline and cuffs, the lighter orange for piping in the side seams.
The quandary that emerged was how to finish the center front where the front, facing and piping all converge at the hem line.

As you can see here, you really don’t want the raw edges of the piping sticking out!

To make matters even more complicated, the jacket wasn’t long enough for a standard hem, so I wanted to face the hem with a border print from the sarong.
I spent a long time at the ironing board testing out different ways to put all the pieces together. First I figured out that I needed to finish the piping at the hemline to be sure it was totally enclosed with no raw edges.


Then I had to figure out whether to finish the center front corners with the hem folded to the outside or the center front facing folded to the outside.


Hopefully you can see by these photos that putting the center front facing to the outside resulted in a cleaner and less bulky finish of all those layers on the corner — so that is the method I chose.


Sometimes there is a lot of trial and error involved in a sewing project when you try to do something new, even when working with a tried and true pattern!
Rae has also made one garment from another Indonesian batik sarong that was in that box of treasures. She created a swimsuit cover-up, a bit longer and looser version of a TRJ.

Notice how brilliantly she used the borders and selvages!

One of the things Rae and I love about Fit for Art is that we have created a pattern line for the thinking sewer; we hope that the Variations teach enough pattern working skills to enable and inspire our customers to be creative with the familiar pattern. We hope you have as much fun trying out new ideas as we do!
Happy Sewing, Carrie


I like it!
I have a question. If I downsized a pattern one size what should I have done with the darts?
If you still have the front tissue pattern, you should be able to find the dart placement for a smaller size on it. If you need more info, contact us directly at info@fitforartpatterns.com.
Hi,
Very nice! Thank you for showing details like finishing the hem over a front facing. Things like that aren’t told in most sewing patterns. I have my pattern for this jacket but haven’t tried it yet. Will do so soon! This is good inspiration!