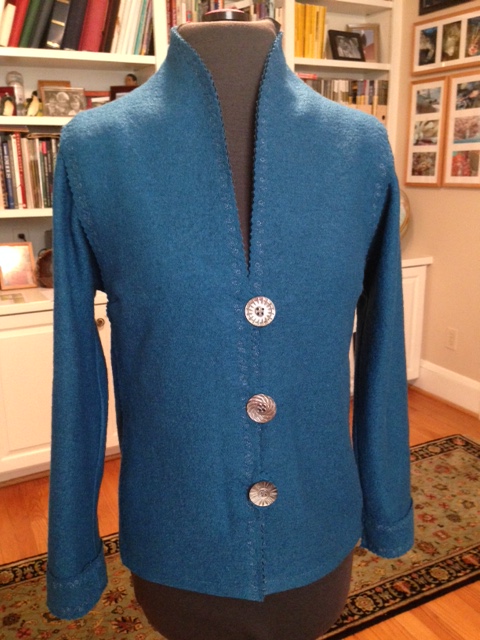
While in Minneapolis last fall for the ASDP conference, I purchased a lovely piece of peacock blue boiled wool from a local fabric store, Treadle Yard Goods. I’m guessing it is a boiled wool jersey because it is softer and drapier than the boiled wool that I associate with Austrian style jackets. I’ve been eager to make an unstructured “sweater” jacket with it and my Tabula Rasa Jacket pattern, so now is the time to be wearing it! This fabric doesn’t fray, making it appropriate for raw edge techniques, and it looks almost the same on both sides, so doesn’t require a lining. I decided to apply the same techniques we’ve used in the past with washed wools, particularly the lapped seams, as in this purple felted wool jacket and felted wool vest from our Photo Gallery.
This was a project that required lots of sample making before I actually started sewing. Because of its softness, I decided that the shoulders would benefit from the support of a facing. I tried out several fusible interfacings on scraps of the wool and settled on the lightest, Envy Silk, to maintain the unstructured feel of a sweater. Next, I reused my interfacing samples to experiment with decorative stitches on my new Bernina sewing machine (exciting end of year acquisition!). I planned to lap the seams to avoid bulky seam allowances and to make the inside of the jacket look as pretty as the outside, so I needed a top stitch that would secure the seam and add the right decorative touch.  I settled on an elegant scroll like pattern that moved, but didn’t take forever to stitch. Finally, I tested the selected stitch in several different threads. I thought I wanted to use a shade of blue just a little off from the fabric’s color, but after trying several shades of blue and variegated threads, I chose a gray Sulky rayon. Here you can see some of my stitching samples.
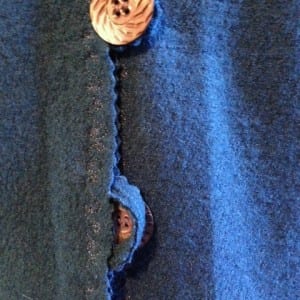
I considered using pinking shears to create an interesting raw edge on the fabric and serendipitously discovered that I had a pinking rotary cutter blade. So much easier and quicker than the shears, and more accurate! As I thought through the construction process, I realized that some seam allowances should be pinked before sewing, such as the side seams (where I needed to cut off ¼” anyway for the lapping), and some should be pinked after, such as the center front. Pinking after the two layers of fabric (shell and facing) were put together meant I didn’t have to worry about lining up the zigzags.
 The shell of the jacket was assembled, but before I could add the facing I had to choose material for the button loops. I had chosen some rather large vintage shell buttons from my stash and purchased a silky gray cord for the loops. After looking at them all together, I felt the cord was too bright and would distract. However, I was concerned that the fabric was so loose that loops made from it would not hold up well. Solution – I ran a length of the cord between two layers of fabric and used a zigzag stitch in matching blue thread to secure them all together. Then I used the rotary cutter to pink the edges of the strips. They turned out to be a little bulky for button loops, but because the buttons are large, it will work well enough!
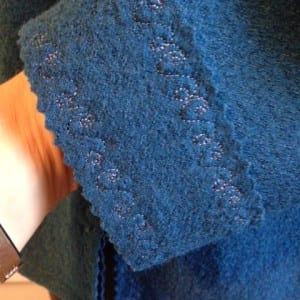 The sleeves also needed some embellishment to tie them into the rest of the jacket. A little weight wouldn’t hurt either, so settled on a false “cuff”. I cut a 2½” wide strip, pinked one long side, formed it into a circle the same circumference as the wrist of the sleeve, and topstitched it onto the sleeve with my decorative stitches along both raw edges. Then I pinked the open end at the same time as the sleeve so the two layers would line up, like the center front.
Every time I tried this jacket on while in construction, I immediately felt warmer. I am looking forward to having this soft and cozy (while fitted and elegant) sweater jacket to wear all winter!
As a little tease, I’ll add that this jacket features a few of the elements of the new Tabula Rasa Jacket variation we have in the works. Any guesses what they might be?
Happy Sewing! Carrie


That looks great! I also tried to use a soft wool to make the Tabula Rosa Jacket but I used a decorative zipper for the front closure, thereby avoiding the problem of buttons and button holes.
Now I am about to try another variation using sweatshirt weight fabric to make a zipper closed ‘hoodie’. extended the front seam to the neckline, raised the back neckline (because no band) and then made a hood pattern to attach. You could also attach a wide scarf from the back to the shoulder seams to make a scarf/hood.
Wow, Joan. Great ideas! All I can say for now is that you seem to be channeling us. We’d love to see photos!
Beautiful! This is the type garment I like. Have to be on lookout for some special fabric.
I love this jacket! Great job and color. Thanks for sharing all your wonderful ideas.
Very pretty!