It is pants blog week so here is a little tip that is making my winter more pleasurable.
First: the back story. I am very pragmatic in wanting my clothing to cross at least three seasons. This is especially true for my basic black and denim blue pants. Two winters ago I began embracing the trend of long tunic tops and these tops are best complimented by pants with narrow legs. So, armed with very stretchy black fabric I pushed the limits of my Eureka! Pants pattern. I made all of my adjustments above the knee in the side seams, narrowing the legs 1/4″ on both the front and the back. Below the knee, I began gradually easing out the inseams and side seams of both the front and the back pattern pieces. At the ankle length hem, I had taken out 5/8” on each side of each seam. I basted in the side seams at first to check the fit, adjusted it a bit for the shape of my legs and finished the pants. I personally don’t like skin tight clothing so I continued to adjust them, through several wearings, until they were perfect. They fit snugly but did not reveal every lump and bump.
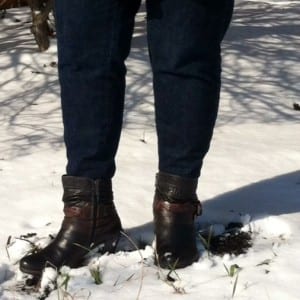
I wore the pants all spring and fall with my long tops and flats. As winter approached I wondered about transitioning the look from ballet flats to warm winter footwear. The easy solution was to buy a pair of boots that were tall enough for the pants to tuck inside, but not so tall that they caused my leg to look short. The perfect boots were acquired and upon first wearing, I was disappointed that the pants were creeping up my leg, looking quite bunchy at the top of the boot. The boots, pants and fabulous long tops languished unworn.
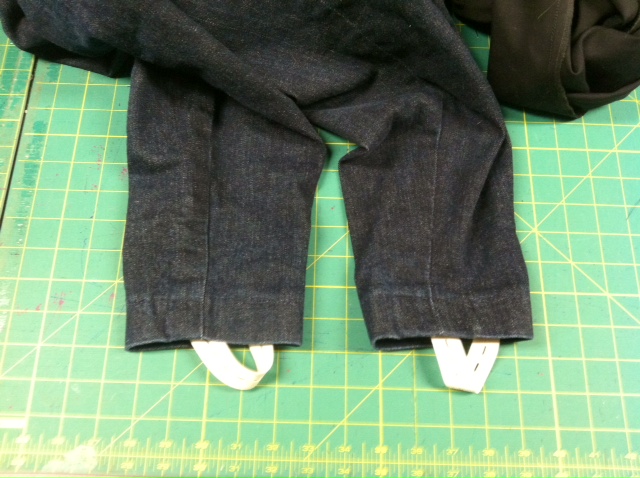
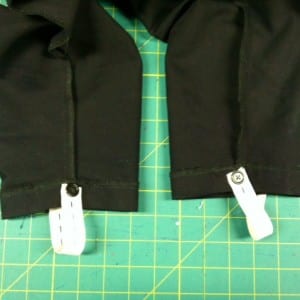
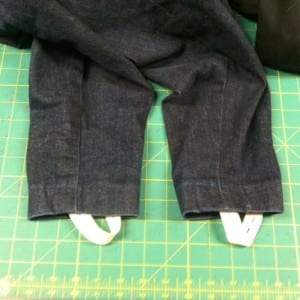
Fast forward a few weeks and I am searching the elastic drawer for something else and find some ¾” elastic with buttonholes woven in every inch. I pulled it out and decided to use it to make removable stirrups to hold the skinny pants neatly inside my boots.
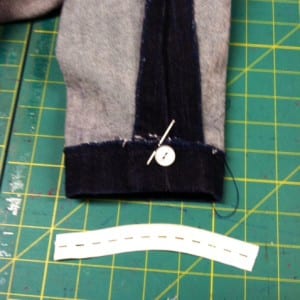
The button box yielded 4 very flat buttons which I stitched into the pants hems at each seam line of each leg. I cut two 7″ lengths of the elastic. As I wore the pants and boots, I tested the elastic until I found the length which was both comfortable and effective in keeping the pants in place. My magic stirrup number is 6” and it easily buttons off one pair of pants and on to another pair.
Don’t have a stash of button hole elastic? It is packaged by both Dritz and Stretchrite and is probably on the wall at your local big box sewing store. If you cannot find it, make your own with soft, smooth elastic, doubled over where you make your buttonholes.
This practical solution is not beautiful but it draws upon my memory of the knit stirrup pants I wore in the early 90’s.
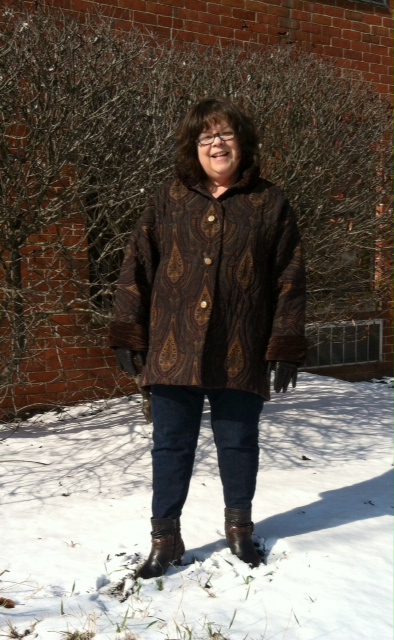
Now my contemporary straight leg pants and tunic tops are a favorite winter look that flawlessly transition to spring by simply unbuttoning the stirrup and changing to flat shoes.
Have you tried this or another technique to fix a wardrobing problem? Share your solutions with everyone in the Fit for Art community.
Happy Sewing, RAE


What a terrific idea…and so very practical! Thanks, Rae.
Love these and I remember wearing those stirrup pants! 🙂
Love the removable stirrup idea. I’m going to put them on my skinny jeans to hold the legs down in my tall boots.!
Great idea Rae. Thank you!
What a great idea!!! This is one of those “why didn’t I think of that?” moments. I’ve been having the same problem and I already have the buttonhole elastic that I love for a few other fixes. Thank-you for sharing.
It is so interesting to me that the simplest things can make such a big difference. Thanks everyone for your fun comments.
Thanks so much for this idea.
This is a great solution! I have to tuck this away until I get my Eureka pants fitted.
Hi Rae, I love receiving your posts and found this one very helpful. I was born and raised in Baltimore, moved around the country, and now live in Hanover, PA. When I lived in Westchester, NY I discovered this shop in downtown Cornell, NY called Sew Green. It is an interesting non- or for-profit concept. I am somewhat involved in the renewal of downtown Hanover and wanted to talk with you about such a shop. If you are at all interested in discussing it, I could make a trip toward Towson/Hunt Valley to meet for coffee. If you’d like to google Sew Green, please do and then send me an e-mail about whether or not you’d like to meet. Mary McCleary
Good timing on this. I used my fit for art pants back to redo an old Butterick pattern I had. The fronts were almost identical, but the back of the Butterick had nothing in common with my more feminine rear. The mashup fit fine, but the legs are a little wider than I would like. To narrow down the fit for art legs, you said you took 1/4″ above the knee in the side seams. That would help…but where did you stop? Did you taper back out right at the hip to keep that fit the same?
Hi Monica,
I have a pretty high hip, so I stop there. I don’t like anything too tight in my upper body which is pretty soft! Sometimes you can take more than 1/4 inch depending on the shape of your legs, but start by pinning out 1/4 easing into the hip bone and see what you get!
RAE