The 100 Day project is an invention, made easy by the internet, where folks join a community of creative souls to work for 100 days on a skill or project they want to try. Every person is doing their own thing – some hope to establish a daily practice, some are interested in pushing the limits of their creative practice. Many participants share their work in online spaces and benefit from prompts that encourage the project’s completion.
The project officially kicked off this year in February and Rae decided to participate as she had a project she wanted to try. It also coincided with a trip to France, where she finds there is a bit more space for creative experimentation when separated from the chaos of her schedule in the States.
If you follow us on either Facebook or Instagram you saw glimpses of the project she was working on and here she is to tell you about her experience which really extended to about 125 days, but who is counting since it was a success?
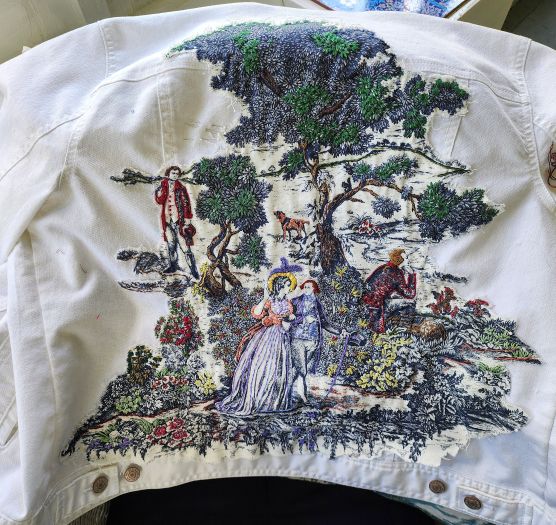
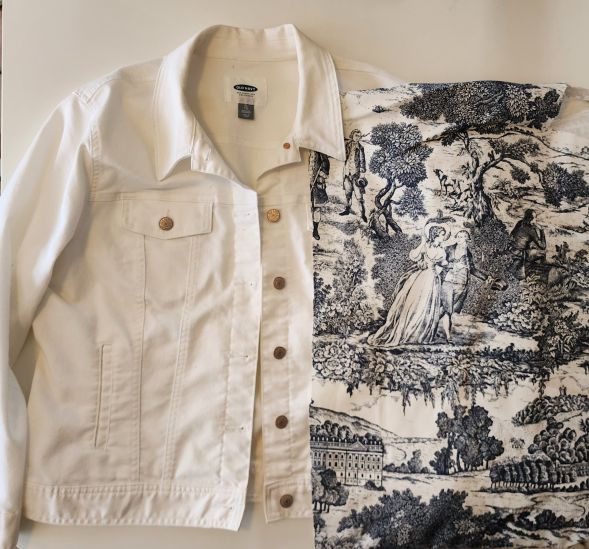
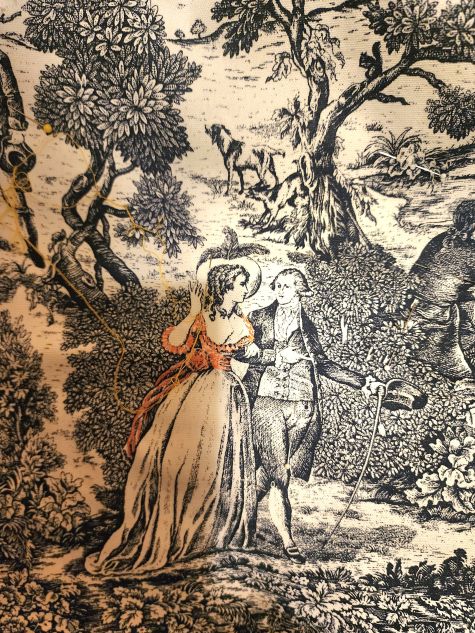
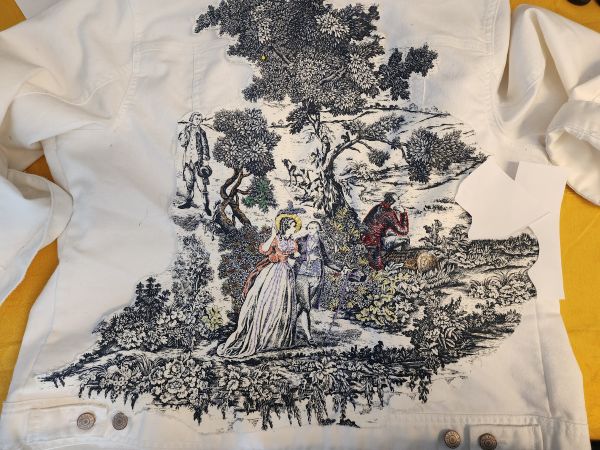
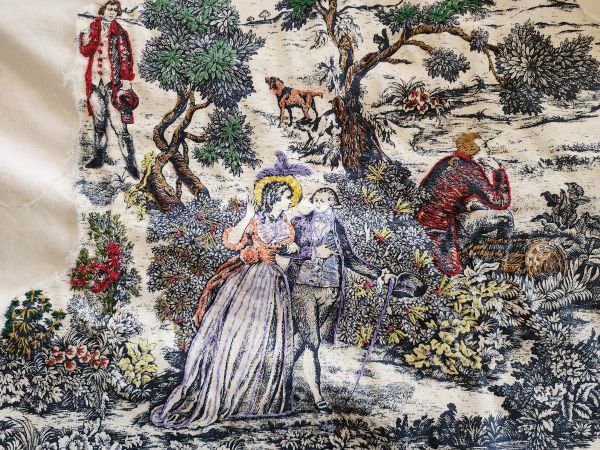
I have been inspired by the work of Richard Saja, which I found on Pinterest, since I discovered his Historically Inaccurate Decorative Arts some years ago. That inspiration plus a white jean jacket that needed decoration and scraps from a project to recover a little chair in Toile de Vie became the vision for the project.

Not exactly sure how to do it, or where to begin, I chose a large scene on the toile fabric, cut it out leaving about ¼ inch extra all around, and pinned it to the back. As is often the case with my experimental work, the back felt like an easy place to start. I had started a sample in October and had an inkling of how to start but decided to create some parameters:
- Work from the middle out so the knots anchoring the embroidery threads could be hidden between the layers.
- Work the entire piece of thread cut and threaded onto the needle before moving to a new color or location.
- Add color to some sections, but not embroider over the entire applique.
- As I reached the outer edges I added an additional parameter: to firmly finish all the outside edges of the large applique so it would not look too raw. (Due to the loose canvas structure of the toile, this seemed important. My speculation was that after a few washings, I would lose some of the scene.)
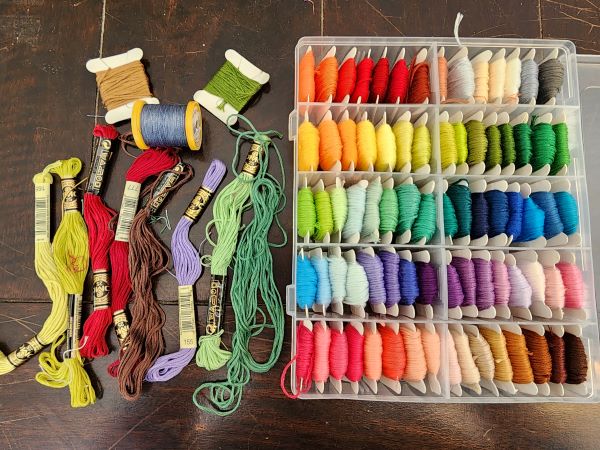
At the beginning, my thread selection was mostly quilting thread, but I quickly found it did not stand out enough on the navy blue of the print. Because there was also lots of embroidery floss around the house, I collected up a group in colors I thought I would like to use. Once in France, I purchased a box of small cards, each wrapped with a new color of floss at a fabric show, my only purchase for this project. They were very useful, especially for the flower elements around the lower section of the applique.
Much of the outside edges were finished with a blue denim thread, doubled, that was a very close match to the print. Several spaces around the edges that had no print needed to have an applique added to the large applique for balance and finishing.
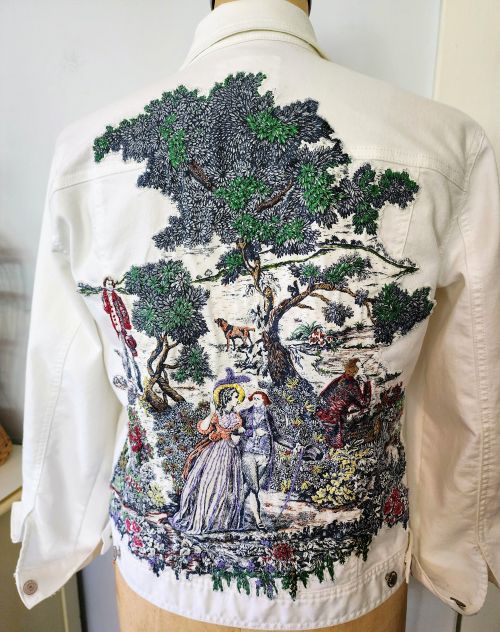
It took about 70 days to finish the back applique. Some days I worked for a while, other days not at all. I tried to fit in a little each day. The hand stitching really keeps my fingers strong and nimble as I get older and creakier!
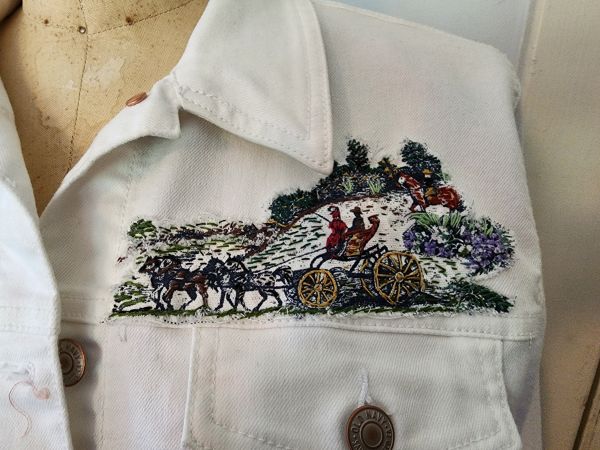
Once I finished the back, which seemed wonderful, the front needed to be designed. That really had me flummoxed as the appliques I wanted to use were so much smaller in scale. Ultimately I found that they needed to be stitched much more thoroughly.
I played with placement and balance for over a week with the coat on my dress form. Because of the pocket detail, the appliques needed to be even smaller than I had planned. Several appliques were made smaller, cut apart, or abandoned. After many tries, the grouping of appliques from right to left, lower left, lower right, seemed to please me.
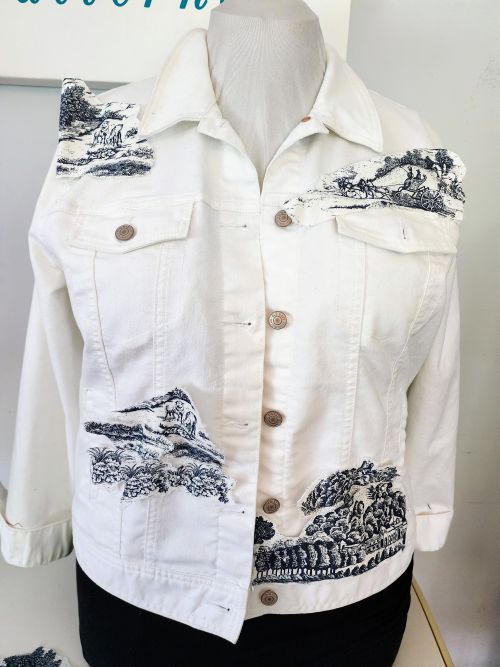
The stitching took a good bit of time, but ultimately, even the building scene at bottom right, came out great. Fearing it would look boring, I took an artistic detour on that applique. The fabric print was called Scenes from Versaille, where the buildings have sandy stone exteriors and grey roofs. I just wasn’t liking that idea, so I decided to use the architectural details found in the southwest of France, where we live part time, with their clay roof tiles and pink stone exteriors. One of the weekly online coaches whose posts I read each Sunday suggested taking liberty with the project, like adding a wild card, so I did.
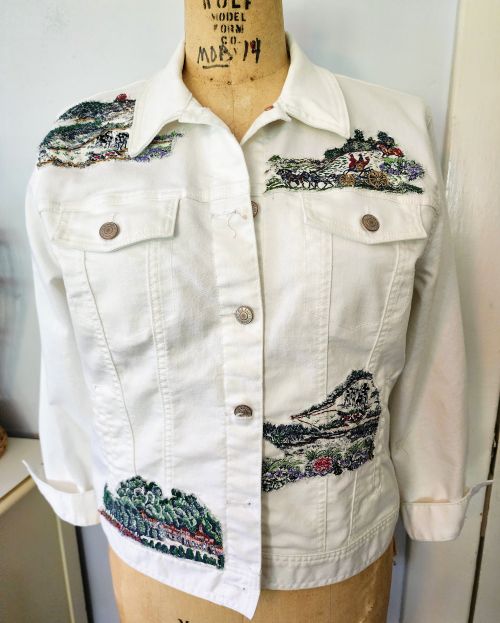
What a crazy experiment, but so fun and already a pleasure to wear. While I would usually add some applique onto the sleeve cuff, here it seems unnecessary and actually I find I roll them, so no need for more.
It is rare that I begin a project with no idea exactly how it will work out. There were definitely some creative stretches along the way. I’m so glad I chose to begin the 100 day project about 10 days early and finish it about 15 days past the official 100 days. It was satisfying and fun to just playfully figure it out as the time moved along and the project reached its colorful conclusion.
Next year I will let you know when and how to sign up for the 100 day project. It is a great way to challenge yourself to move in a new and creative direction. I am excited to share this applique idea with the students coming to work with us at La Cascade soon. It is like coloring with a needle and thread. Keep an eye on the Instagram and Facebook pages this week for more photos of the many steps.
Happy Stitching, RAE


Beautiful!
Rae, that is an absolutely stunning work of art! I love the idea of committing yourself to 100(or more!) days of handwork with a general plan but room for experimentation. Kudos to you for another amazing project! Best wishes to you from Canada, Sue Sudbury
This is inspirational! What a wonderful technique. Thanks for sharing.
I love the jacket. You are very inspirational and talented. Thanks for sharing.
Rae
I’m so glad to hear this beautiful jacket is in France so I can see the finished work and hear more about the 100 days project.
See you soon
Linda Krouse
thanks for all the lovely comments, I will be sharing it everywhere I go during the next few months. Just love it!
This gives me inspiration, I love it!!
Very beautiful, inspiring work connecting time and space ! And yes “Denim” once was a heavy fabric made in Nîmes (South of France) so “Toile de Nîmes” became Denim…And Toile de Jouy was, as well made in the town of Jouy (west of France) and used to be linen. Now, the patterns are style called Toile de Jouy but no longer made in the place, and are often cotton. In your hands, it became “Toile de Vie” (toile of life) and that is 100% accurate. That’s art as well as craft.
Thanks for the language lesson! Love your turn of phrase – Toile de Vie!