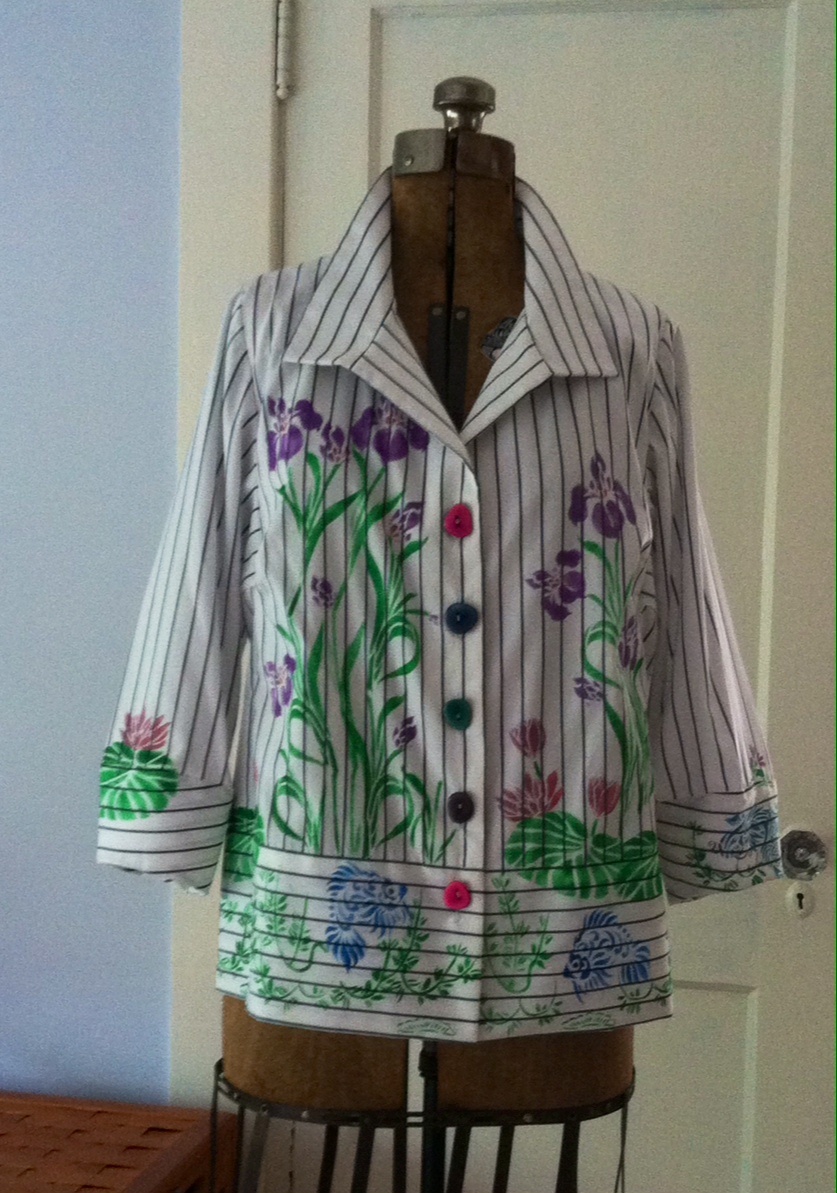

Last week’s post outlined the creative process I used to plan my new white shirt and prepare to stencil the shirt using Paint Sticks. Here is the rest of the story and the finished Tabula Rasa Jacket with the Shirt Variations!
To get started, I cleaned off my dining room table, leaving it covered with the table pads for protection in case I made a paint mess. The partially constructed shirt took up a good bit of the table. There was just enough extra room to lay out some newspaper and paper towels for the paints and stencils when they were not being used.
The iris stems and leaves and the green sections of the lily pads were stenciled first.

Then the floral blooms were carefully placed to avoid the darts on each front. As an avid observer of nature I tried to place the flowers so they were grouped naturally. When the floral section was complete, I took a break.

For my second painting session, the fish and the pond fronds were my special focus. They were spaced randomly so the added band on the shirt was filled with fish and plants but not laid out symmetrically.
The Paint Stick box suggested that the fabric needs to sit for at least 24 hours, ideally 48 hours before moving it from the work surface. While the shirt sat and the paint cured, I planned for the sleeves.

A summer sleeve and lantern cuff had been cut based on my original design plan, but I had not decided whether they should be decorated or not. I decided to put a small design on each sleeve where it joined the cuff near the elbow. The cuffs were stitched to the sleeve just where I would be stenciling the design.

The photos show that one sleeve is stenciled with a fish and pond frond with a small blossom.
On the other sleeve, I put a small lily pad. The designs were placed to complement the designs on the shirt.
The buttons also became a small obsession while I was waiting for the paint to dry! They were arranged and rearranged until I found my favorite placement, deciding to use 5 instead of the 7 I had purchased. All the collar and facing pieces were cut and interfaced so I could get right to work once the paint was dry and heat set.

At the sewing machine I completed the shirt construction by stitching in the darts, sewing the shoulder seams, finishing the sleeve seams, cuffs and connecting the sleeves to side panels. Then the sleeves and the remaining side panels were inserted into the shirt. After putting the collar and facings onto the shirt, I assessed the composition of the painting before finishing the band. The left front, which would cross over the right in classic women’s garment construction, needed some additional stenciling. The band needed an additional pond frond and a few more iris leaves between the buttons to complete the picture. This painting had to be done carefully because the shirt is now three dimensional.

This paint also needed to cure for 48 hours before the final construction was completed.

The front band was finished by hand, the button holes were made on the sewing machine.
Once the final touches were added, the composition was much as I had imagined when I planned it in my sketches. My painting would probably be assessed by an expert as only satisfactory and I confess to focusing on the smudges, where the stencil slipped or left a bit of tell-tale paint around the edges. But, for a first effort made with stash fabric, I am delighted. The fanciful design really says summer to me.

The paint stick directions suggest you should wait 2 months before washing the embellished fabric, so I have only worn the shirt once. But this week, the waiting period is over, and you can be sure I will be enjoying my new white shirt on a regular basis.
Many of you have told me I should name my embellished creations. My first thought was, One Fish, Two Fish, Teal Fish, Blue Fish. What do you think? Share your title ideas with me and the Fit for Art community. Share your paint stick stories with the group too.
Happy Sewing, RAE


Enjoyed viewing the process. Lovely shirt! Perfect for the striped fabric.
Do the paint sticks make the fabric stiff? I had considered trying Shiva paintsticks and a quilter who uses them for embellishment thought the end results would be ok for fiber artwork but too stiff for garments. You seem to be very pleased with the shirt and that makes me want to consider trying this technique.
What brand are the paintsticks?
I have used Lumiere paints for garments and leather, but there would be more control with paintsticks thus avoid “bleeding” that happens sometimes with paints.
Hi Jessica, Great questions. I used the Shive paintsticks directly on the fabric. It stiffins it just a bit. Having learned this technique from a quilter I will tell you that after she paints the fabric, she mounts the painted fabric onto a fusable product that is light weight but has glue on both sides. This does make the fabric stiffer, but the paints directly on the fabric, and not solidly applied, only stiffins it a little. I did not get any bleeding, but I did use the brushes that Laura Murray sells that work with paintsticks and stencils, and I made a bunch of samples. Have fun! RAE
I love this! It’s beautiful, and so inspiring! I vote for your title!
I vote for your title as well. I love how that turned out. I never would have thought to use a striped fabric as my base but I think it’s great. Thanks for the ideas and keep them coming. I need all the inspiration I can get.